The built-in scanner of Microsoft’s operating system called Windows Defender, as a rule, ensures the safety of user data, blocking malicious files. However, there are situations when an antivirus package interferes with the work of other applications, mistaking them as dangerous to the computer. In this case, it helps to disable its tracking function.

Contents
Disabling Windows Defender
You can deactivate the program in several ways by contacting the standard Windows 10 tools or by using third-party tools. Next, we will consider the most popular methods for solving the above-described problem.
Method 1: Win Updates Disabler
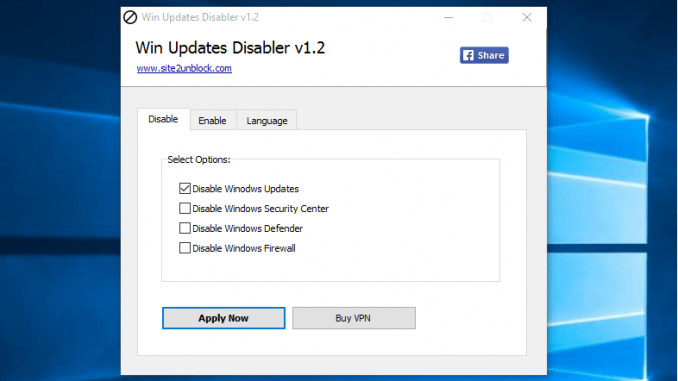
This free application gives the user the option to remove automatic updates of various system components, as well as disable the standard antivirus.
Step 1: Open the Win Updates Disabler program on your computer.
Step 2: Select the option “Disable Windows Defender” by ticking it.
Step 3: Click the Apply Now button to apply the changes.
Step 4: A few seconds later, a small notification will appear, indicating the successful completion of the procedure. Select “Yes” to restart the computer.
Step 5: After that, real-time protection will be disabled.
You can always re-enable the antivirus, as well as undo the latest changes, using the appropriate section of the program.
Method 2: Destroy Windows 10 Spying (DWS)
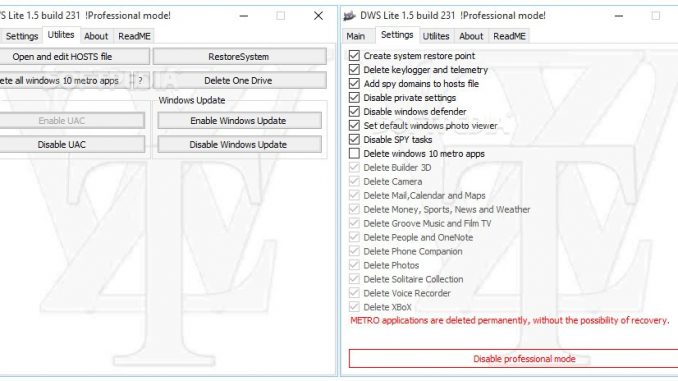
With this simple utility, the functions of tracking user actions in Windows 10 are blocked. Also, this application allows you to prohibit the operation of Windows Defender.
Download Destroy Windows 10 Spying
Step 1: Run the DWS program on your computer.
Step 2: Open the “Settings” section, then select the option “Enable professional mode“. Check the “Disable Windows Defender” checkbox.
Step 3: Return to the Home tab and click the Destroy Windows 10 Spying button
Step 4: Wait for a while until the new settings take effect. As with the previous program, in a new window, select “Yes” to restart the device.
The next time the system starts, the antivirus will no longer work.
Method 3: Windows Startup Panel
As a rule, Windows Defender starts automatically when the system starts. You can disable this feature by using the standard Startup panel.
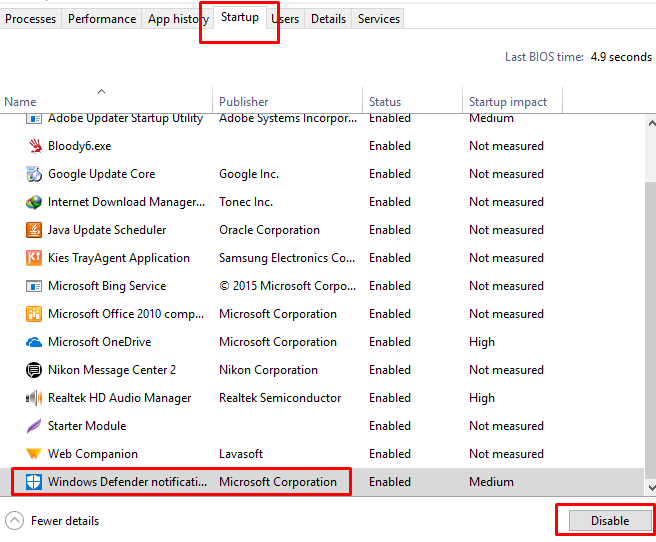
Step 1: Type Ctrl + Shift + Esc to start Task Manager.
Step 1: Open the “Startup” tab and find the “Windows Defender notification icon” in the process list. With the left mouse button selected, click Disable.
Therefore, the system scanner will not automatically turn on while the computer is being booted.
Method 4: Windows Defender Security Center
Disabling of continuous scanning of the system for possible threats is performed through the usual section of the standard antivirus settings.
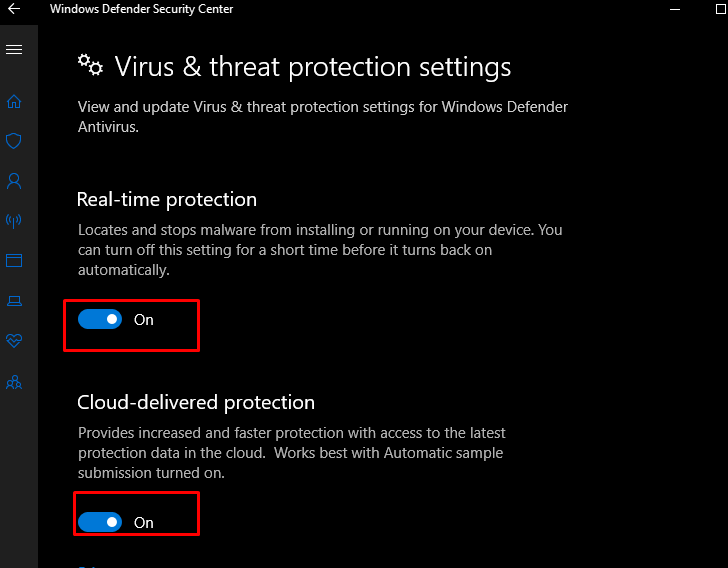
Step 1: Go to the Windows Defender Security Center menu.
Step 2: Click the icon named “Virus and Threat Protection“.
Step 3: Once on the next screen of the application, drop a little lower and select the “Antivirus and other threats protection settings” item.
Step 4: Set the switch responsible for the configuration “Real-Time Protection” to the “OFF” position.
After that, the main function of the antivirus will be deactivated.
Method 5: Windows PowerShell
Working with the command line, you can solve many known problems with just a couple of actions. In this case, you will need access to Windows PowerShell.
Step 1: Start the console with administrator rights. Click on Start on PC and select “Windows PowerShell (Administrator)“.
Step 2: Copy the following text into the text field and press Enter :
powershell Set-MpPreference -DisableRealtimeMonitoring $true
After completing this action, you will block the operation of the standard system security feature.
You might also like:
How to Promote Your Instagram Page/Profile
How to Create a VKontakte Group
Be the first to comment